
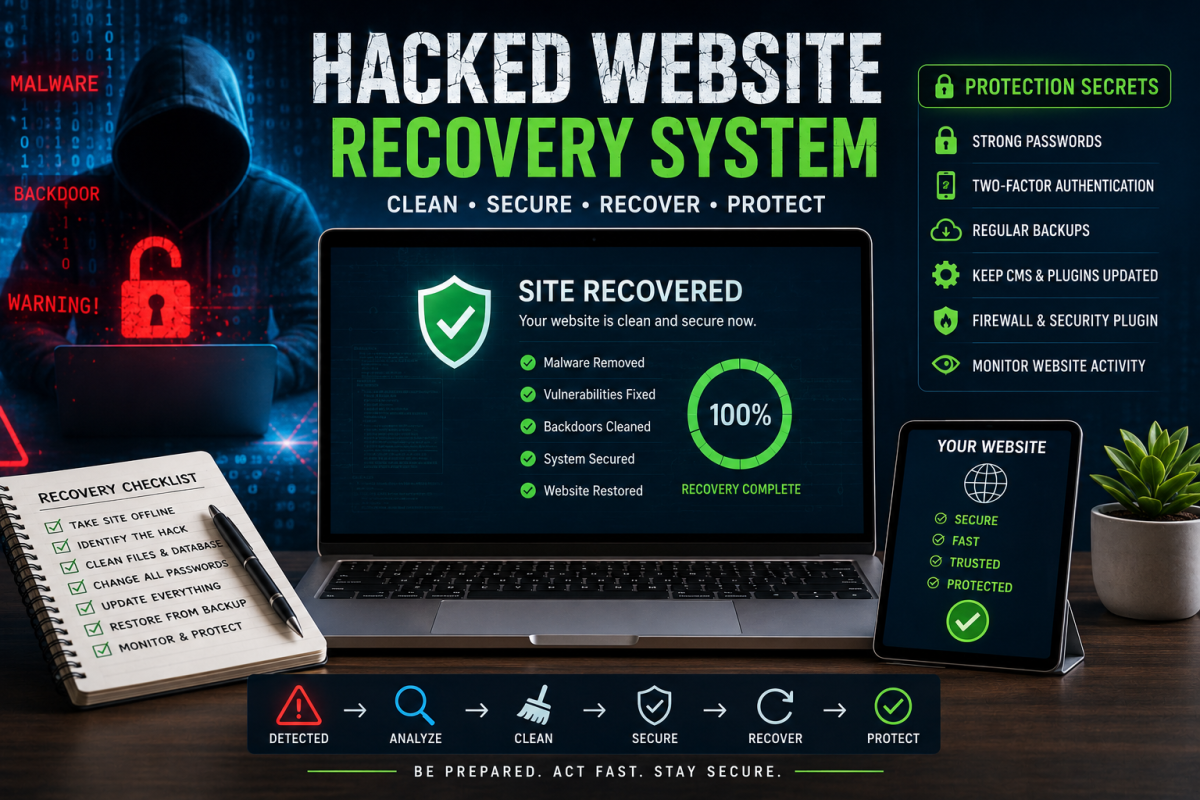
A hacked website rarely looks dramatic at first. Most owners do not open the homepage and see a skull, a warning banner, or a ransom note. More often, the first sign is quieter: a customer says the site redirects to a strange page, Google Search Console reports unknown Japanese or casino URLs, the contact form starts sending spam, the server becomes slow at night, or the hosting company suspends the account for malware. That is why hacked website recovery is not just a technical cleanup job. It is an incident response process. You have to protect visitors, preserve evidence, remove the infection, close the original weakness, recover search trust, and rebuild a safer routine so the same problem does not return two weeks later.
This guide is written for website owners, bloggers, WordPress users, Laravel developers, small businesses, affiliate marketers, ecommerce sellers and freelancers who manage client websites. It does not teach hacking. It teaches recovery. The aim is simple: when a website is compromised, what should a responsible owner do first, what should they avoid, what professional responders look for, and what hidden mistakes keep causing reinfection?
There are many website platforms, but the recovery logic is similar across WordPress, WooCommerce, Laravel, custom PHP, static sites, cPanel hosting, VPS servers and cloud hosting. A compromised site usually has one or more of these problems: stolen credentials, outdated software, a vulnerable plugin or theme, weak file permissions, exposed admin panels, infected uploads, malicious cron jobs, poisoned database content, modified redirects, hidden admin users, compromised API keys, or server-level backdoors. Cleaning only the visible bad file is not enough. You must find the reason the attacker got in.
Professional guidance from CISA’s ransomware response guide, Google Search Central’s hacked site advice, WordPress hardening documentation and OWASP testing resources all point toward the same lesson: recovery is not a single button. It is a controlled sequence.

First 30 Minutes: Stop Panic, Protect Users, Preserve Evidence
The first mistake most people make is rushing into the File Manager and deleting whatever looks strange. That may remove evidence, break the website further, or leave the real backdoor untouched. A better first move is to slow down for a few minutes and document what you know. Take screenshots of warnings, record the time the issue started, note suspicious URLs, save emails from hosting providers, and export logs if your hosting panel allows it. If you later need help from a security professional, this context matters.
If visitors are being redirected, served malware, asked for fake payment details, or shown spam pages, put the site into maintenance mode or temporarily block public access. Google has long advised hacked-site owners to take the site offline while fixing serious compromise, or use a proper temporary response if the site cannot be fully taken down. That is not ideal for traffic, but sending users into a compromised site is worse. If the website is an ecommerce store, disable checkout until you confirm that payment pages and customer data are safe.
Do not assume the hack is only inside WordPress, only inside Laravel, or only inside one plugin. A shared hosting account can contain multiple websites. One infected site can reinfect another through shared credentials or writable folders. A VPS can have server-level compromise. An email account can be used to reset admin passwords. An old FTP account can still exist from a developer who worked with you two years ago. Recovery has to include the account, not just the homepage.
| Immediate Action | Why It Matters | Professional Tip |
|---|---|---|
| Document symptoms | Screenshots, logs and URLs help identify the type of compromise. | Save evidence before deleting files or restoring backups. |
| Protect visitors | Redirects, spam, malware and fake checkout pages can harm users. | Use maintenance mode or temporary access control during cleanup. |
| Contact hosting support | They may have malware scan results, suspension notes or backup snapshots. | Ask for file paths, timestamps and server logs, not only “please fix it.” |
| Freeze changes | Editing during incident response can hide what happened. | Avoid installing random cleanup plugins before you have a backup copy. |
| Check all connected accounts | A hacked email, FTP, hosting or admin account can re-open the site after cleanup. | Rotate passwords and enable two-factor authentication after evidence is preserved. |
How Websites Usually Get Hacked
Most website attacks are not personal. Attackers scan the internet for known weaknesses and then automate exploitation. A small travel blog, a local restaurant site, a coupon website and a WooCommerce store can all be attacked by the same bot if they expose the same vulnerable plugin or weak login. That is why “my website is too small to hack” is a dangerous belief. Small websites are often easier targets because nobody watches logs, nobody updates plugins, and nobody tests backups.
The most common entry points are painfully ordinary. A reused password from an old data breach. A nulled theme downloaded from a Telegram group. An abandoned plugin that has not received security updates. A writable uploads folder that allows executable PHP. A database backup left publicly accessible. An admin page protected by “admin123.” A staging site forgotten on a subdomain. A cPanel account shared with too many freelancers. A Laravel .env file exposed by wrong server configuration. These are not exotic nation-state attacks. They are housekeeping failures.
On WordPress sites, attackers often place malicious PHP files inside wp-content/uploads, modified theme files, plugin folders, or fake plugin directories with names that look boring. On custom PHP sites, they may hide backdoors inside helper files, cache folders, vendor directories or image upload areas. In Laravel, the biggest emergencies often involve exposed environment files, stolen application keys, misconfigured storage, old dependencies, insecure file upload logic, or admin credentials leaked through weak operational practices.
The Recovery Rule: Do Not Clean What You Do Not Understand
There is a tempting shortcut: scan the website, delete infected files, change the password, and call it finished. Sometimes that works for a simple infection. Often it does not. If the attacker still has a backdoor, API key, database user, cron job, hidden admin account or compromised hosting login, the site can be infected again. In professional incident response, cleanup and root-cause analysis happen together. You remove what is malicious, but you also explain how it arrived.
A useful question is: what changed shortly before the hack became visible? Did you install a cheap theme? Did a developer request FTP access? Did you move hosting? Did you restore an old backup? Did you upload a plugin zip from an unofficial site? Did you disable two-factor authentication because it was inconvenient? Did your hosting provider recently email about suspicious scripts? Most recovery clues are not hidden in one place; they are scattered across timelines.

A Professional Hacked Website Recovery Workflow
Every case is different, but the sequence below is a practical model. It works for WordPress, cPanel hosting, Laravel projects and many small business sites. Large companies may require formal legal, forensic and compliance steps, especially if customer data or payment data may be involved. For small sites, the same logic can still be used in a leaner way.
- Confirm the compromise. Check the homepage, admin panel, Google Search Console warnings, hosting malware reports, server logs, suspicious redirects, unknown files, changed database entries and unexpected users.
- Contain the damage. Put the site in maintenance mode, disable checkout if needed, restrict admin access, block public execution of uploads where possible, and prevent visitors from landing on harmful pages.
- Take a full backup of the infected state. This sounds strange, but you may need it for investigation. Store it separately and label it clearly as infected.
- Collect logs and timestamps. Access logs, error logs, FTP logs, cPanel logs, WordPress user history, plugin update history and server-level logs can help identify the door used by the attacker.
- Scan files and database. Look for web shells, encoded payloads, unexpected redirects, suspicious admin users, injected JavaScript, spam links, cron jobs and altered configuration.
- Remove or replace compromised components. Whenever possible, replace core files, plugins, themes and vendor packages from official clean sources instead of manually editing suspicious code.
- Patch the original weakness. Update software, remove abandoned plugins, delete nulled themes, close file upload gaps, rotate secrets, fix permissions and secure admin access.
- Restore public access carefully. Test the site, forms, checkout, admin login, emails, redirects, sitemap, robots file and key SEO pages before going fully live.
- Request review if blacklisted. Use Google Search Console or relevant security vendors to request a review after the site is clean.
- Monitor for reinfection. Watch file changes, logins, cron jobs, outgoing emails, server load, Search Console and analytics for at least a few weeks.
| Phase | Goal | Common Mistake |
|---|---|---|
| Identify | Understand what happened and where the infection appears. | Only checking the homepage and ignoring database/search spam. |
| Contain | Stop user harm and prevent attacker activity from continuing. | Keeping checkout live while payment pages may be compromised. |
| Clean | Remove malicious files, injected content and unauthorized users. | Deleting one file and leaving the backdoor or stolen password active. |
| Patch | Fix the weakness that allowed compromise. | Restoring an old vulnerable version because it “worked before.” |
| Recover SEO | Remove indexed spam and request security review if necessary. | Ignoring hacked search results after the website looks normal. |
Secret 1: Make an Infected Backup Before You Clean
Many beginners think the first backup should be the clean backup. In reality, a copy of the infected site can be useful. You should not restore it to production, of course. But it gives you something to compare against, especially if the cleanup accidentally removes needed files. It also preserves timestamps, malicious file paths and database traces. If you hire a security expert later, they may need that snapshot to understand the attack.
Store the infected backup outside the public web root and label it clearly. Do not keep it mixed with normal backups. If you download it to your computer, do not double-click suspicious files. Treat it as evidence, not as a working website copy.
Secret 2: Replace Core Files Instead of “Fixing” Every Strange Line
When WordPress core files are modified, the safest path is often to replace them with fresh files from the official source, while preserving legitimate content and configuration. The same idea applies to Laravel vendor packages, CMS core files, themes and plugins. If a file should be identical to a known clean version, replacement is cleaner than manual surgery. Manual cleanup is needed for custom code, theme customization, database content and uploaded files, but official core files should not be treated like mystery novels.
This is one reason version control is powerful. If your project uses Git, you can compare current files against a known clean commit. Unexpected differences become visible. For Laravel, custom PHP, React frontends or serious WordPress theme development, Git is not only a developer convenience; it is a recovery tool.
Secret 3: Database Infections Are Easy to Miss
A website can look clean in File Manager while still being compromised in the database. Attackers often inject spam links, malicious JavaScript, hidden iframes, fake admin users, suspicious options, redirect rules or SEO spam into database tables. WordPress sites may have injected content in posts, widgets, options, user metadata or theme settings. Ecommerce stores may have altered payment settings or inserted fake admin accounts. A custom CMS may store templates, menus or scripts in database fields.
Search the database for suspicious domains, unknown script tags, base64-like strings, iframes, pharmaceutical keywords, gambling terms, Japanese spam titles, strange admin emails and recently modified options. Be careful, though. Not every encoded string is malicious, and not every suspicious word proves compromise. The goal is to investigate patterns, not destroy content blindly.
WordPress Recovery Checklist
WordPress powers many websites, so it is also a common target. A professional WordPress recovery starts by checking users, plugins, themes, core files, uploads, database options and server-level settings. Remove unused themes and plugins. Replace WordPress core from official packages. Update trusted plugins and themes. Delete nulled or abandoned items. Check administrator accounts and remove any user you do not recognize. Reset passwords for all admins, editors, hosting users, FTP accounts and database users when appropriate.
Disable PHP execution in uploads if your hosting setup allows it. Review wp-config.php for unknown code. Check .htaccess and web server rules for hidden redirects. Search wp-content/uploads for PHP files, because normal image uploads should not need executable scripts. If a security plugin reports malware, do not simply click “delete all” without knowing whether it might remove custom code or break the site. When in doubt, stage the cleanup first.
WordPress hardening documentation emphasizes regular updates, trusted themes/plugins, strong authentication, secure hosting and careful permissions. That may sound basic, but after most hacks the basic items are exactly what failed. The secret is not a magical plugin. The secret is boring discipline done consistently.
Laravel and Custom PHP Recovery Checklist
Laravel websites have different recovery concerns. Check whether the .env file was ever exposed publicly. Rotate database passwords, mail credentials, API keys, payment keys, object storage keys and the application key if you suspect secret exposure. Review routes, controllers, middleware, uploaded files, storage symlinks, public directories and cron/scheduler entries. Look for unknown files inside public, storage, custom upload directories and old backup folders.
Run dependency updates carefully. Composer packages should come from trusted sources, and outdated packages should be reviewed for known vulnerabilities. Check file permissions. On many hacked PHP sites, the attacker abuses writable directories and then executes uploaded code. A clean Laravel deployment should keep sensitive configuration out of public directories, enforce upload validation, store user files safely, and separate code deployment from public uploads.
If the application handles user accounts, orders, messages or payments, review whether data may have been accessed. That is not always easy to prove from basic shared hosting logs, but it should be considered. If customer data may be involved, the incident becomes more serious than a simple defacement.
cPanel Recovery: Where to Look
For many small websites, cPanel is the control room. After a hack, review File Manager, Backup, Backup Wizard, SSL/TLS Status, Email Accounts, Forwarders, Cron Jobs, FTP Accounts, MySQL Databases, phpMyAdmin, MultiPHP Manager, Redirects, Zone Editor and Raw Access logs. Attackers may create cron jobs that re-download malware. They may add email forwarders to spy on messages. They may upload malicious files through old FTP accounts. They may modify redirects so only Google visitors are sent to spam pages.
Check whether there are unknown subdomains, addon domains or parked domains. Look for old development folders such as /old, /backup, /test, /newsite, /wp-old or zip files left in public directories. A backup zip containing database credentials can be as dangerous as a live config file. Remove what you do not use. Archive private backups outside the web root.
SEO Recovery After a Hack
Website owners often clean the visible site and forget search results. That is a mistake. Google may have indexed thousands of hacked URLs, spam titles, fake pages or malicious redirects. Use Google Search Console to check Security Issues, Manual Actions, indexed pages, sitemaps and unusual queries. If the hack created fake URLs, return proper 404 or 410 responses for pages that should not exist. Do not redirect all hacked spam URLs to the homepage; that can confuse search engines and users.
After cleaning, submit a review if Google flagged the site. Update the sitemap. Inspect key URLs. Request indexing for cleaned pages where appropriate. Watch search queries over the next few weeks. If your analytics suddenly show traffic from irrelevant keywords, continue investigating. SEO spam hacks are often designed to remain invisible to normal visitors while showing different content to search crawlers or referral traffic.
| SEO Symptom | Possible Cause | Recovery Action |
|---|---|---|
| Unknown indexed pages | Spam pages generated by malware or database injection | Remove source, return 404/410, resubmit clean sitemap. |
| Japanese/casino/pharma titles | SEO spam injection | Clean database, theme files and generated pages; request review. |
| Browser warning | Malware, phishing, unsafe scripts or blacklist detection | Remove malware, patch cause, request blacklist/security review. |
| Traffic collapse | Security warning, deindexed spam, damaged trust or broken redirects | Fix security issue first, then audit index, sitemap, redirects and content. |
After Cleanup: Rotate Secrets Properly
Password changes should not be random or partial. Rotate hosting password, CMS admin passwords, database password, FTP/SFTP users, SSH keys, email passwords, API keys, payment keys, SMTP credentials, cloud storage keys and any tokens stored in configuration files if exposure is possible. Remove old users. Do not leave a former developer’s FTP account active. Do not share one admin login among multiple people. Use a password manager and two-factor authentication.
For Laravel, WordPress and ecommerce sites, secrets may be stored in config files, environment files, database options, plugin settings or hosting panel tools. If a backup containing secrets was publicly accessible, treat those secrets as compromised. If an attacker accessed your admin panel, assume they could read plugin settings, user lists and sometimes stored API tokens. Rotating only the WordPress password may not be enough.
Hardening: How to Make Reinfection Less Likely
Hardening is not about making a website impossible to hack. No honest professional promises that. Hardening makes compromise harder, detection faster and recovery easier. Start with updates. Remove unused software. Keep only trusted plugins or packages. Use least-privilege accounts. Set proper file permissions. Disable unnecessary admin features. Use a web application firewall where appropriate. Keep backups separate from the hosting account. Monitor file changes. Use two-factor authentication. Limit login attempts. Protect the domain registrar account.
For WordPress, avoid nulled themes and plugins completely. They are one of the fastest ways to turn a website into someone else’s machine. For Laravel and custom sites, validate uploads strictly, keep dependencies updated, disable debug mode in production, protect environment files, and separate public assets from executable code. For cPanel hosting, remove old domains, old zips, test folders and unused FTP accounts. For VPS servers, update the OS, configure a firewall, use SSH keys, disable password login where appropriate, and monitor logs.
When to Restore from Backup
Restoring from backup can be the fastest path, but it has a trap: the backup may already be infected or vulnerable. If you restore a three-week-old copy but the vulnerable plugin remains, the attacker may return. If the hack started two months ago and you restore last week’s backup, you may restore the malware too. A good backup strategy includes multiple restore points and some knowledge of when the compromise began.
After restoring, update and patch before reopening the site. Rotate credentials. Remove unnecessary users. Scan the restored copy. Compare it with the infected snapshot. Test forms, checkout, login, admin pages, emails and SEO pages. A clean backup is not automatically a secure website. It is a starting point.

Should You Hire a Professional?
If the website is small, has no customer data and the infection is simple, an experienced site owner may recover it with hosting support and careful cleanup. But professional help is worth considering when the site handles payments, stores customer data, has repeated reinfections, is blacklisted by browsers, runs on a VPS, contains custom code, or supports a business. A good professional does more than “remove malware.” They identify root cause, document findings, secure the environment and help build a prevention plan.
Be careful with cheap cleanup services that promise instant magic. Ask what they will check: files, database, users, cron jobs, logs, redirects, backups, SEO spam, hosting accounts and server configuration. Ask whether they provide a written summary. Ask whether they will harden the site after cleanup. If they only install a plugin and click scan, you may be paying for temporary relief rather than recovery.
A Practical 7-Day Recovery Plan
Day 1: Contain the site, preserve evidence, contact hosting support, take an infected backup, export logs, and stop public harm. Do not chase every suspicious file yet.
Day 2: Identify the platform-level issue. Check users, plugins, themes, uploads, database, config files, cron jobs and redirects. Build a timeline of suspicious changes.
Day 3: Clean or replace compromised files, remove malicious database entries, delete unknown users, remove abandoned software and close public execution paths.
Day 4: Patch everything. Update CMS core, plugins, themes, Composer packages, server packages and PHP versions where safe. Rotate credentials and secrets.
Day 5: Test the site in detail. Check desktop, mobile, admin, forms, checkout, email, search, sitemap, robots file, redirects and key landing pages.
Day 6: Handle SEO and blacklist recovery. Use Search Console, inspect URLs, submit clean sitemap and request security review if warnings exist.
Day 7: Turn recovery into a routine: backups, update schedule, monitoring, access control, documentation and monthly security review.
Hidden Places Professionals Check First
Attackers like boring places. They do not always name a backdoor hack.php. They may use names that blend into normal hosting life: cache.php, class-wp-cache.php, old-index.php, wp-config-backup.php, image.php, mail.php, or a random string inside an uploads folder. On a Laravel site, they may hide files inside public storage, old deployment folders, temporary ZIP extractions, forgotten test directories or a misconfigured public path. On cPanel, they may leave a cron job that recreates the malware every few hours. That is why a site can look clean in the morning and become infected again by evening.
Look at recently modified files, but do not trust modification time completely. Skilled attackers may change timestamps or place malware inside files that already change often. Compare against a clean copy when possible. Search for suspicious patterns, but remember that legitimate libraries may also contain encoded or minified code. The point is not to panic at every compressed JavaScript file. The point is to recognize files that do not belong in that folder, code that executes commands, unexpected remote requests, hidden iframe injections, and PHP code inside places intended only for images or documents.
Professionals also check ownership and permissions. A file owned by the wrong user, a public folder set to overly broad write permissions, or a database user with more privileges than necessary can make cleanup fragile. If you keep seeing new malicious files after deletion, the attacker may still have write access through a script, cron job, panel account, API token or compromised deployment process.
Communication Plan: What to Tell Users, Clients and Hosting Support
For a personal blog, you may only need a short notice: the site is under maintenance while a security issue is being investigated. For a business site, communication needs more care. Do not make claims you cannot prove. Do not say “no data was affected” unless you have evidence. A better phrase is: “We are investigating a security issue, have temporarily limited access, and will update users when the review is complete.” That sounds less comfortable, but it is more honest.
If the website stores customer accounts, orders, form submissions, health information, payment data or private documents, the incident may have legal or regulatory implications depending on your country and user base. In that case, consult a qualified professional. A website owner should not hide a serious data exposure just to protect reputation. Trust is damaged more by silence than by responsible disclosure.
When speaking with hosting support, be specific. Instead of saying “my site is hacked, fix it,” ask whether they can provide malware paths, timestamps, process logs, access logs, FTP login history, resource spikes, outgoing mail reports and the last clean backup date. Some hosts will not provide all of this on shared hosting, but asking precise questions often produces better help.
Tools That Help, and Their Limits
Security plugins, malware scanners and online checkers can be useful. They can identify known signatures, suspicious redirects, altered WordPress files, unsafe links and blacklist warnings. They are especially helpful for beginners who need a first map of the infection. But tools are not a substitute for judgment. A scanner may miss a custom backdoor. It may mark legitimate code as suspicious. It may clean files while leaving the vulnerable plugin installed. It may not inspect your database deeply. It may not see server-level issues.
Use tools as part of a process. Scan the website, read the findings, verify file paths, compare against clean versions, check database content, review logs, patch the root cause and rescan. For WordPress, reputable security plugins can help with file integrity and login protection. For server-level work, command-line tools and host-level scanners may be needed. For SEO spam, Search Console and manual query checks are often more revealing than a normal malware scan.
Do not upload your full website backup to random online scanners. A backup may contain database passwords, API keys, customer data and private content. Use trusted tools and understand what data you are sharing.
Backups: The Recovery System You Build Before the Hack
A good backup plan answers four questions. Where are backups stored? How often are they created? How far back can you restore? Have you tested a restore? Many website owners only discover after a hack that their hosting backup is too old, too expensive to restore, stored inside the same infected account, or not actually complete. A backup that has never been tested is a hope, not a plan.
For small websites, keep at least one off-site backup that includes files and database. For active ecommerce or membership sites, backups need to be more frequent because orders and user data change constantly. For Laravel or custom applications, backup the database, uploads, environment configuration, queue-related data and any storage areas not tracked by Git. For WordPress, backup the database and wp-content, but remember that plugins and themes should still be reinstalled from clean official sources when possible.
Do not keep public backup ZIP files inside public_html. Attackers and search engines can sometimes discover them. If a backup contains wp-config.php, .env, SQL dumps or customer data, public exposure becomes a serious security problem. Store backups outside the web root or in protected cloud storage with strong access control.
Red Flags That the Site Is Still Not Clean
A website may appear normal after cleanup, but several signs suggest the job is unfinished. New unknown files appear again. Server CPU spikes at the same time every day. Search Console continues to discover spam URLs. Admin users reappear. Emails are sent from the domain without your knowledge. Browser warnings remain. The site redirects only from mobile devices or only from search traffic. The database contains fresh spam links. Cron jobs point to unknown URLs. Hosting support reports the same malware path again.
These are not random annoyances. They are signals that the backdoor, cron job, credential compromise or database infection may still be active. In that situation, stop treating the case as a one-file problem. Rebuild the timeline and look for the persistent mechanism. It may be faster to migrate clean content into a fresh installation than to keep polishing a compromised environment.
Clean Rebuild vs Manual Cleanup
Sometimes the cleanest recovery is not cleaning at all. It is rebuilding. If a WordPress site is full of abandoned plugins, unknown custom code, nulled themes and years of messy file uploads, a fresh installation with clean theme files and carefully migrated content can be safer than trying to disinfect every corner. The same applies to custom PHP sites with no version control and no clear separation between application code and user uploads.
A rebuild takes more time, but it can remove years of technical debt. You install fresh core files, use only trusted extensions, import clean content, recreate necessary settings, rotate all credentials and connect the domain after testing. For a business website, this may be the moment to move to better hosting, implement Git deployment, add off-site backups and document access properly.
Manual cleanup is reasonable when the site structure is clean, the infection is limited, and you can identify the root cause. Rebuild is better when the site is a maze, the compromise is old, reinfection keeps happening, or there is no confidence in the integrity of the codebase.
Special Warning for Ecommerce Websites
Ecommerce recovery needs extra care because payment trust is involved. If a WooCommerce, Magento, OpenCart, Shopify-connected custom app or Laravel store is compromised, check more than pages and plugins. Review payment gateway settings, checkout templates, admin users, API keys, webhook URLs, order export plugins, email templates and injected scripts on checkout pages. Attackers sometimes try to skim payment details, alter payout settings or collect customer information through fake scripts.
If payments are processed through trusted third-party gateways and card data never touches your server, risk may be lower, but not zero. A malicious script on the checkout page can still harm users. After cleanup, test checkout carefully, rotate payment gateway credentials if needed, and review orders around the suspected compromise window. If customer data may be affected, get qualified legal and security advice before making public claims.
Monthly Website Security Routine
Recovery should lead to routine. Once a month, review administrator users, update software, test backups, check Search Console, scan for malware, review file changes, remove unused plugins or packages, check contact forms, inspect cron jobs, verify SSL, and confirm that domain and hosting accounts use two-factor authentication. This routine does not need to take a full day. For a small site, it may take thirty minutes. The value is consistency.
Also keep a simple incident document. Write down hosting login location, domain registrar, DNS provider, backup location, developer contacts, restore steps, admin users, email provider and key emergency actions. During a hack, stress makes people forget basic things. A written plan saves time.
| Monthly Task | What to Check | Why It Helps |
|---|---|---|
| Backup test | Restore a copy in staging or confirm files/database are complete. | Prevents panic when a real recovery is needed. |
| Access review | Admin users, FTP/SFTP, SSH, database users and hosting subaccounts. | Old accounts are a common hidden risk. |
| Update review | CMS, plugins, themes, Composer packages, PHP and server packages. | Reduces exposure to known vulnerabilities. |
| Search health | Security issues, indexed pages, query changes and spam-looking URLs. | SEO spam is often detected in search data first. |
| File review | New PHP files in uploads, suspicious zips, old backups and modified core files. | Finds early signs before they become public damage. |
Final Thoughts: Recovery Is a System, Not a Secret Button
The real secret of hacked website recovery is that professionals do not rely on one secret. They rely on sequence. They preserve evidence, contain damage, identify the entry point, clean files and database, rotate credentials, patch the weakness, verify the result, recover search trust and monitor afterward. Beginners often skip half of that sequence because the homepage “looks fine.” That is how reinfection happens.
A hacked website can feel embarrassing, but it is also a warning. It tells you that the site has become valuable enough to be targeted, or exposed enough to be found by automated attacks. Use the incident to build better habits: trusted software, clean backups, strong access control, careful updates, secure hosting and regular monitoring. The goal is not fear. The goal is confidence—the kind that comes from knowing exactly what you will do if something breaks again.